Members Portal – Migrating and Configurations
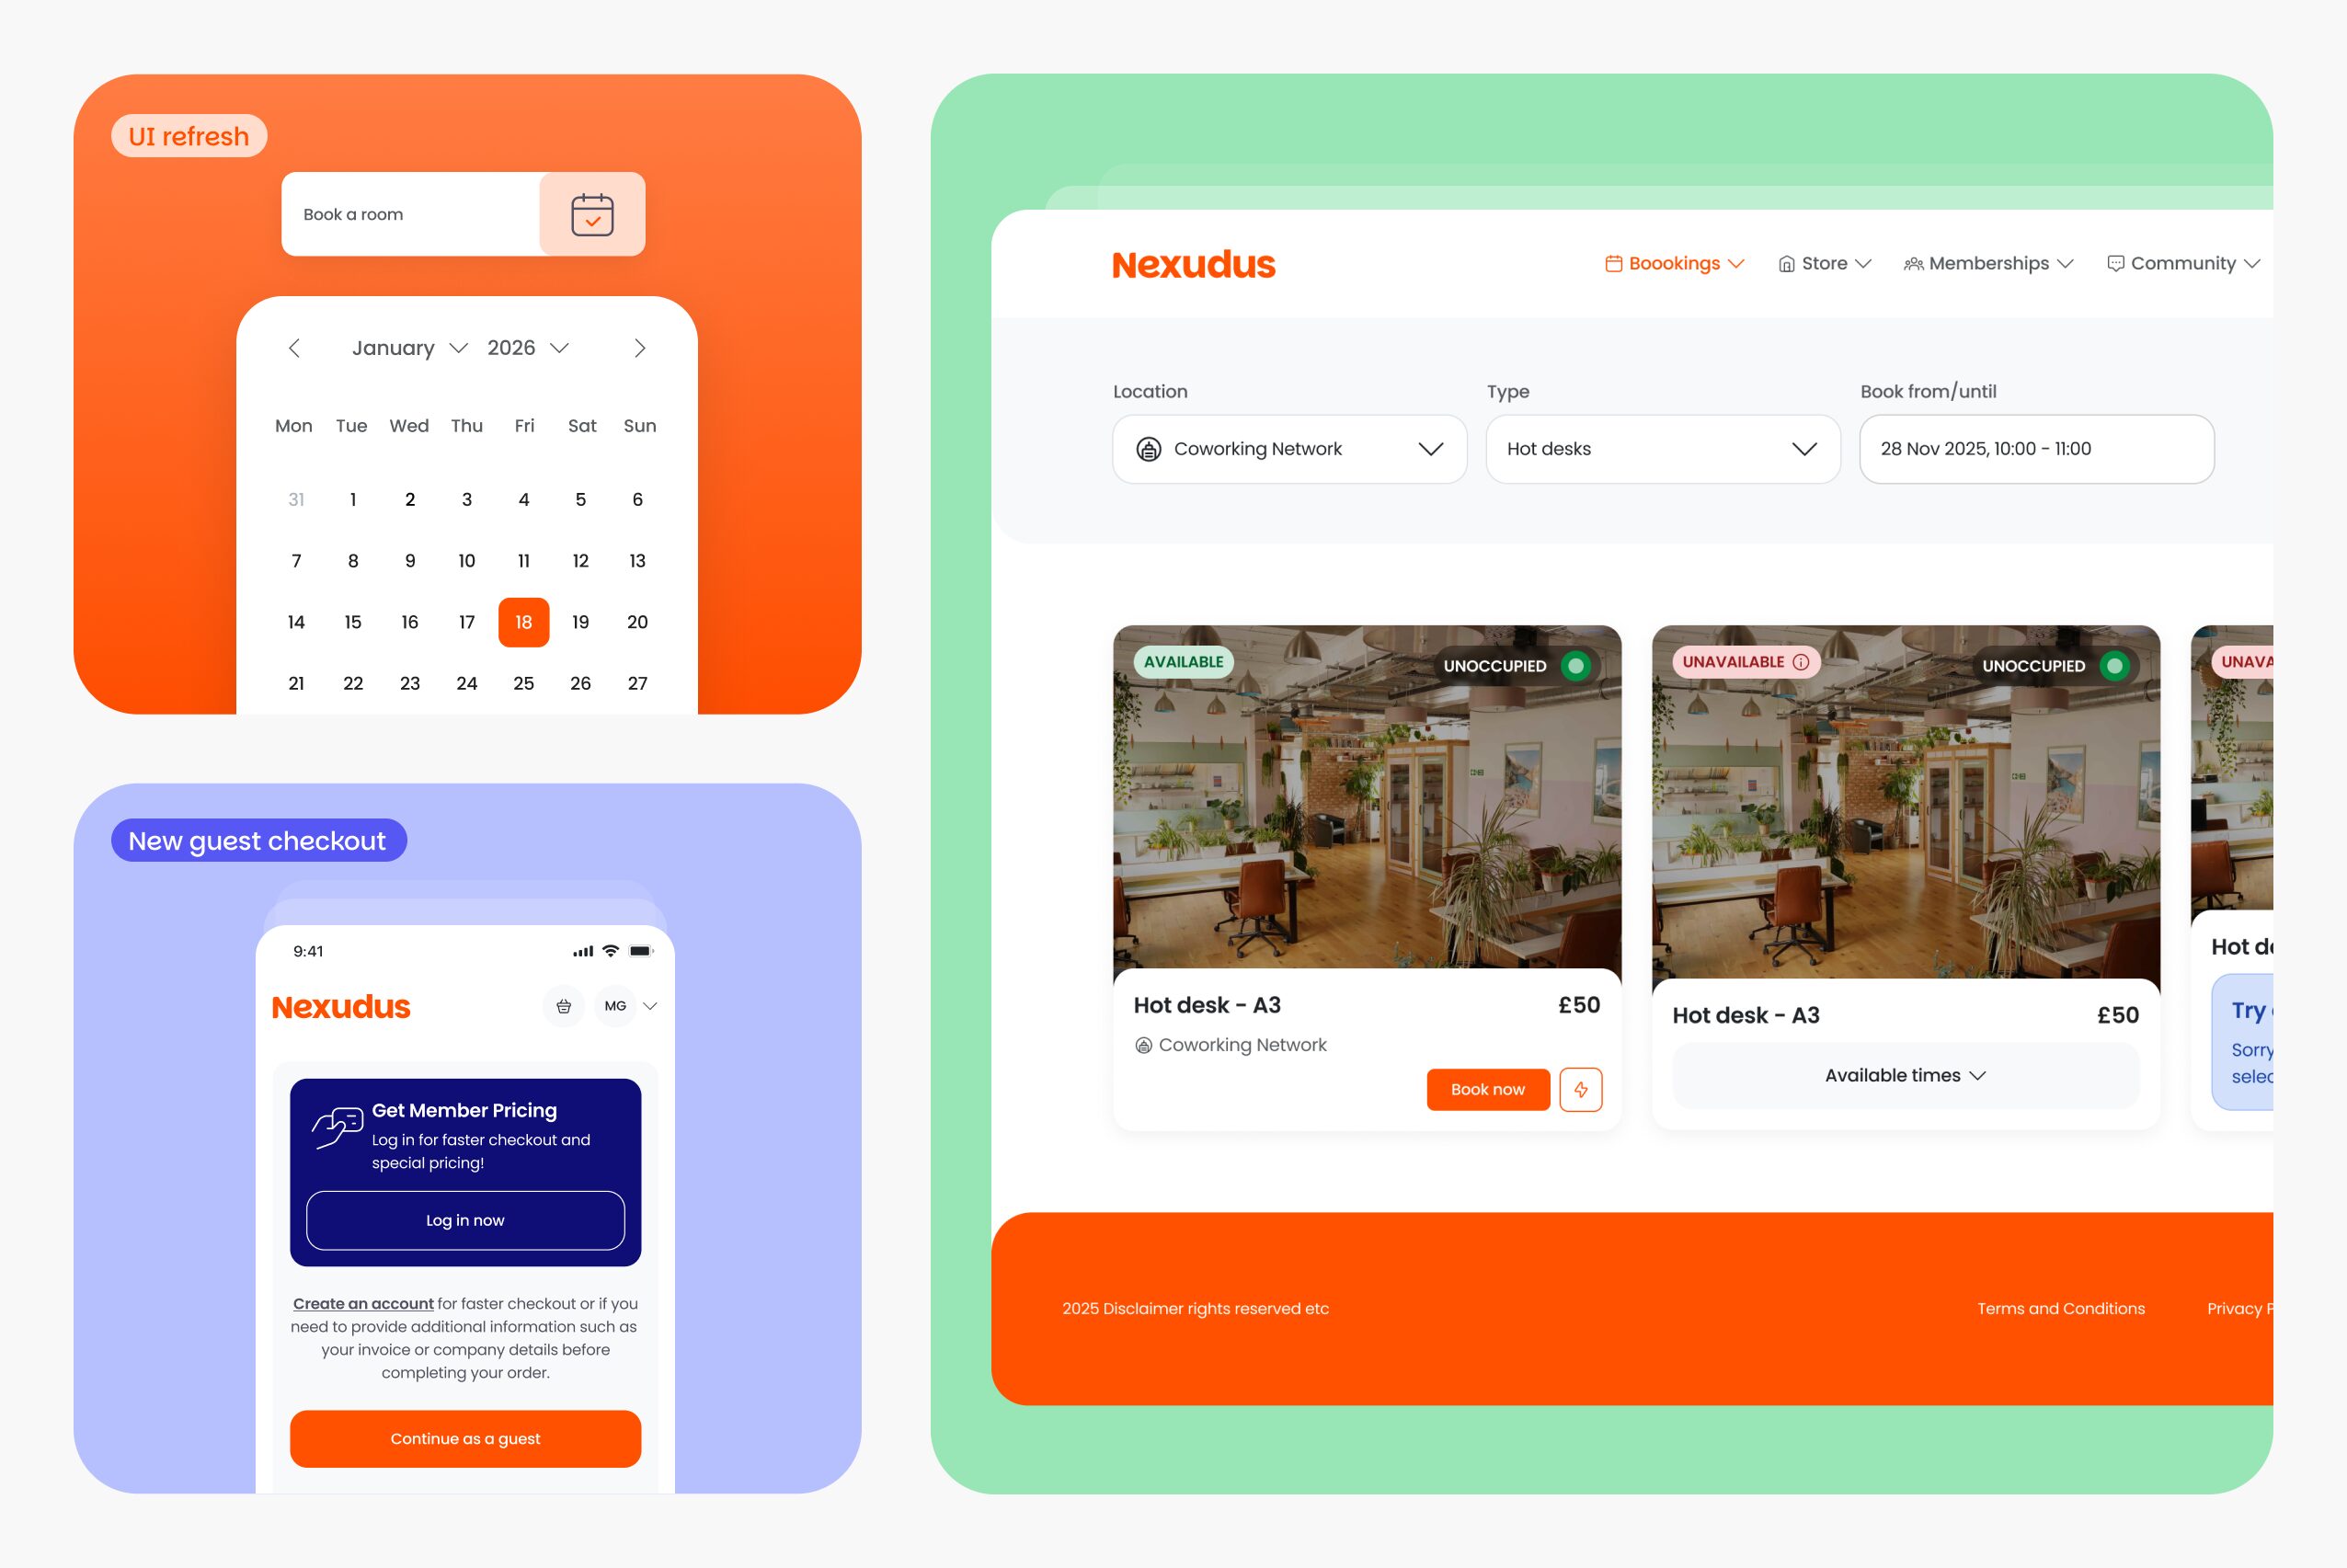
The first iteration of the new Members Portal is here! This update introduces a complete shift in how you design and manage your member experience, moving away from complex web templates to a fast, and intuitive drag-and-drop editor.
- Design Without Developers: The built-in drag-and-drop editor allows you to design the member experience yourself, launch pages faster and stay in control of your budget.
- Performance Optimised: Benefit from faster loading times, e-commerce widget embedding, and improved caching strategies for a smoother user experience.
- Mobile-First Approach: Re-designed from the ground up to ensure members have a consistent booking and checkout experience across all devices.
Migrating to the New Portal
Migrating to the new Members Portal is simple and can be done in as little as 30 minutes. Before migrating, we strongly recommend using the Preview tool.
Note: We recommend only migrating when you are completely ready, as you cannot reverse the migration easily.
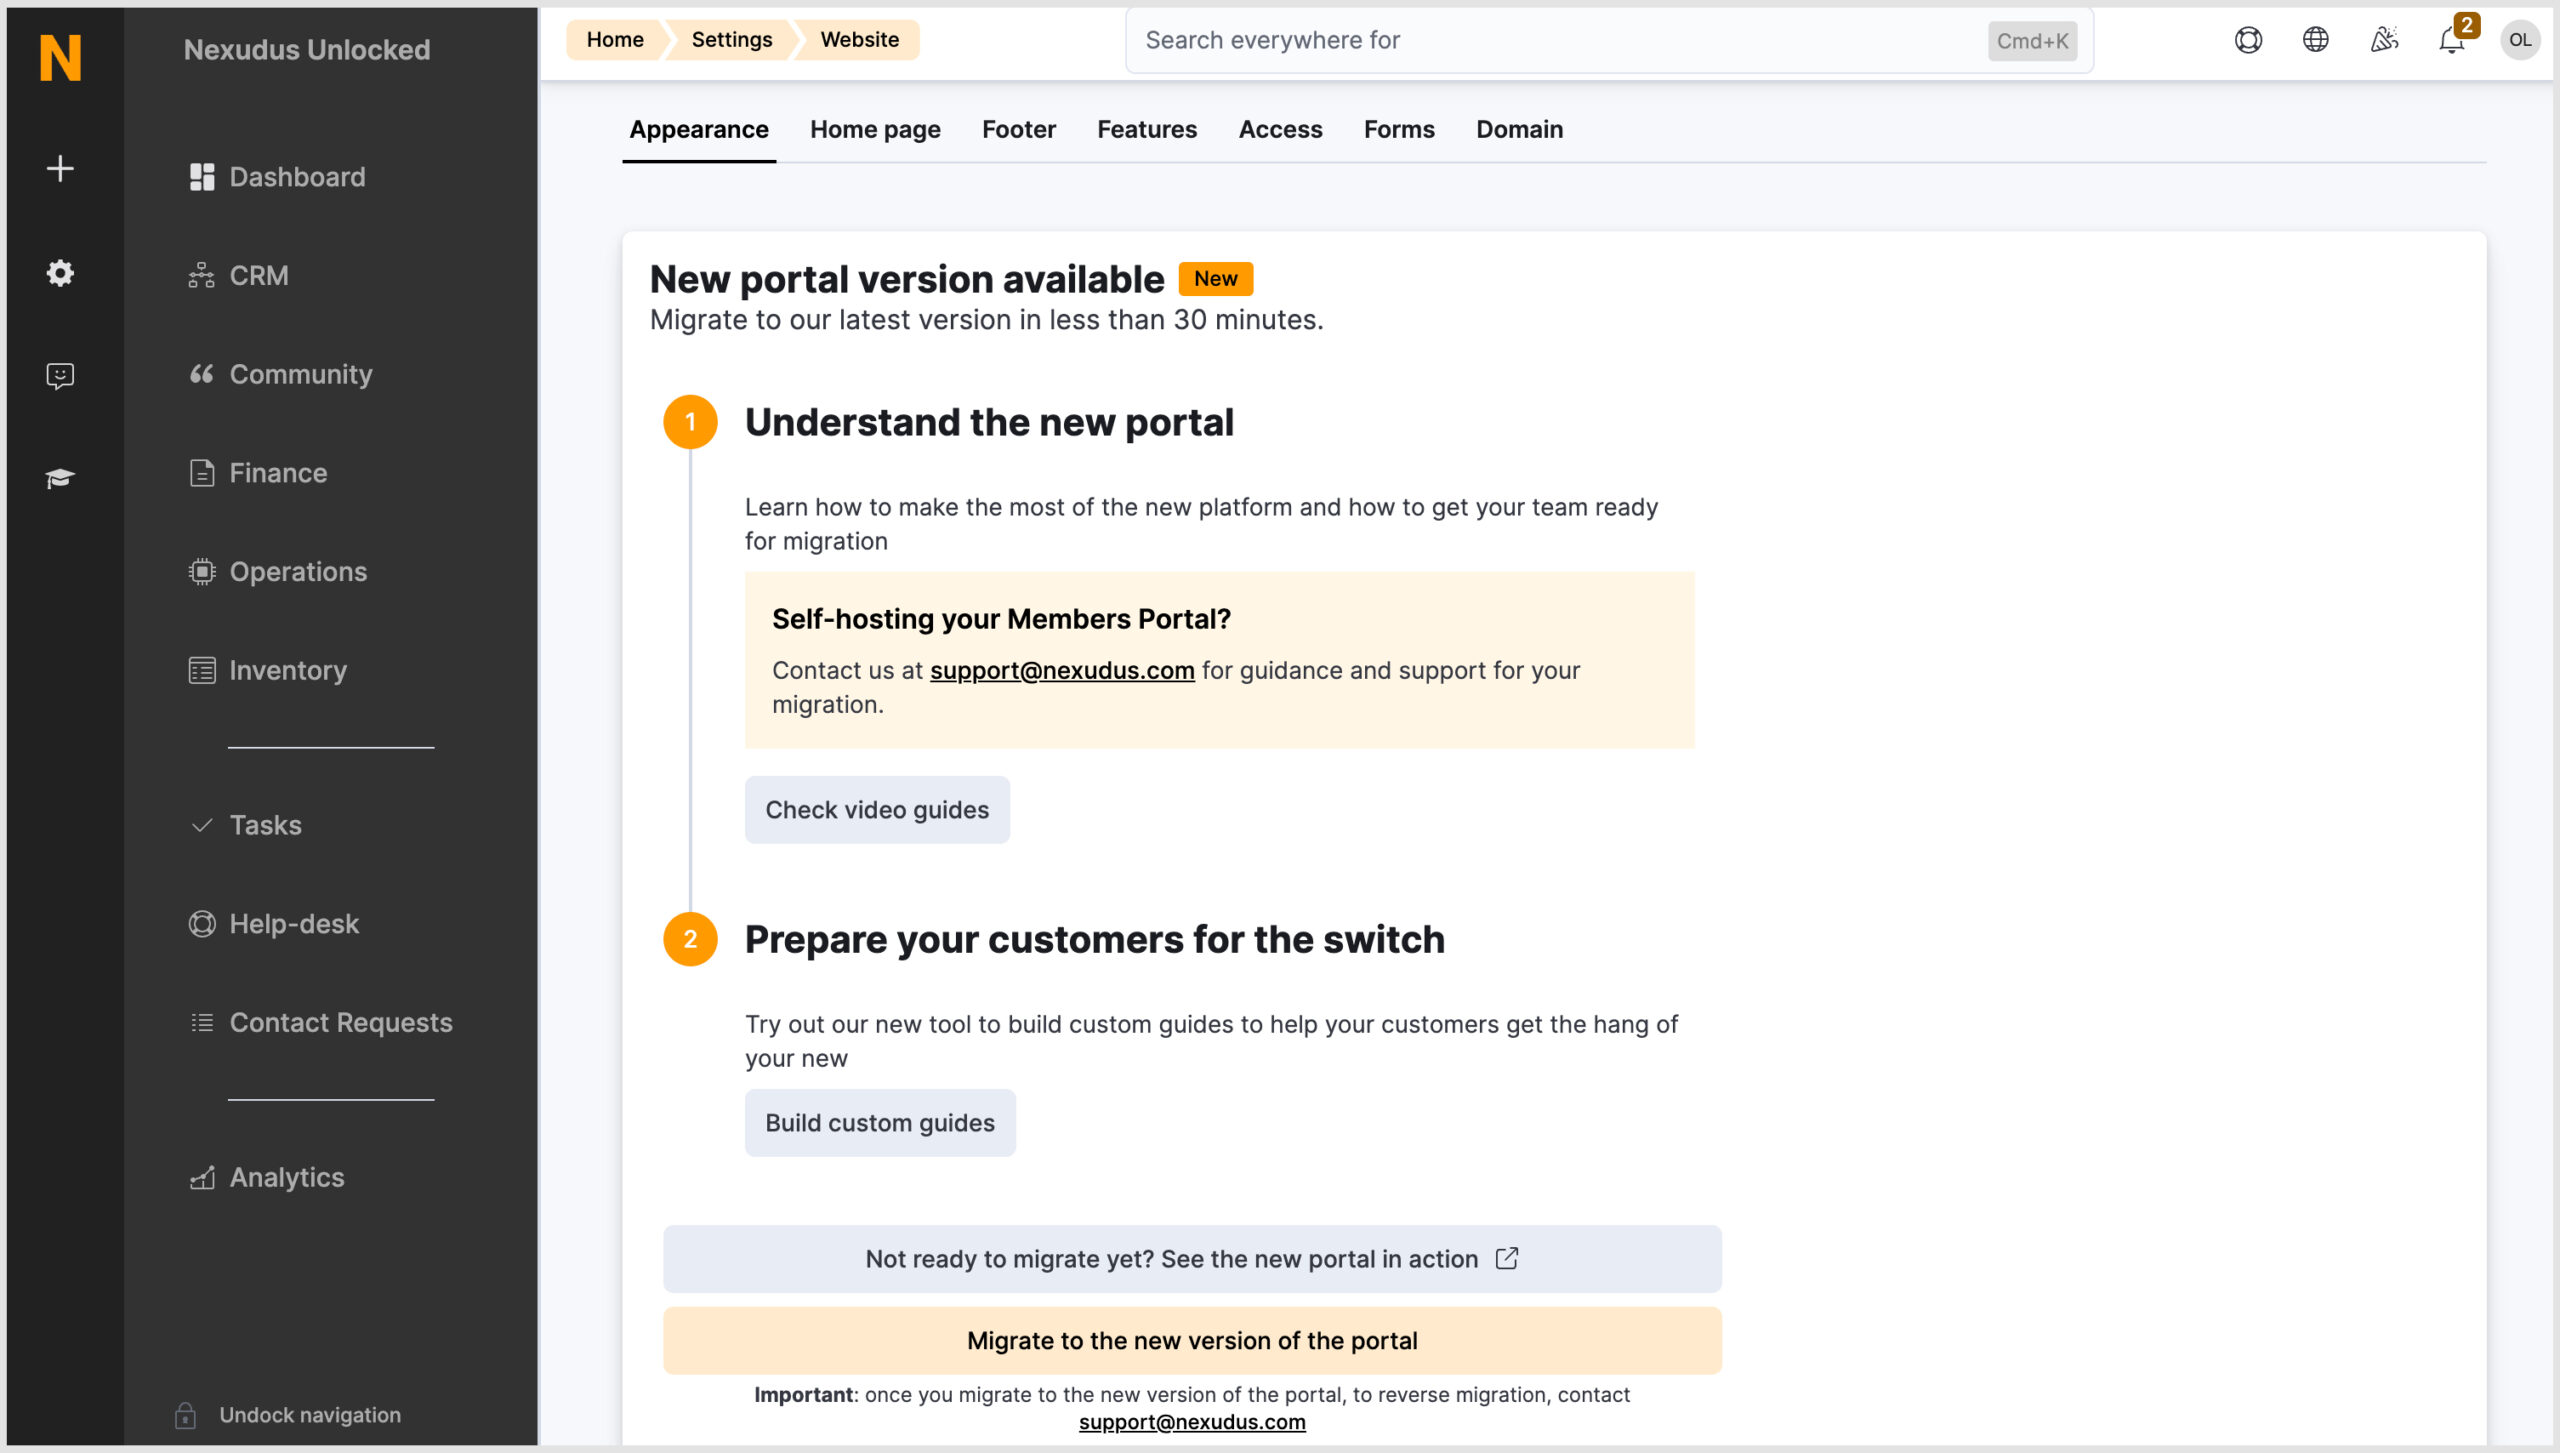
How to migrate
- Navigate to Settings > Website > Appearance in the Admin Panel.
- Click Migrate to the new version of the portal.
- Verify SSL Certificates: If you are using your own domain or subdomain, you must ensure your SSL certificates are up to date before migrating. Check here for more information on custom domain setups.
- Select I’m ready to migrate.
Important: If in the instance you needed to reverse the migration after it has been finalised, you will need to contact support@nexudus.com.
Self-hosting
Watch this space as we are working on the option to be able to self-host the newest version of the Members Portal. For more information on self-hosting, check out the Knowledge Base or contact the Support team at support@nexudus.com.
The Members Portal Editor
The new built-in editor moves away from the traditional web template editor to a drag-and-drop system.
Note: You still access the Invoices and Statement files in the File drive in the Admin Panel Settings.
Accessing the Editor
- Via the Admin Panel: Navigate to Settings > Website > Editor and click Open Editor.
- Via the Members Portal: Log in using your admin credentials (ensure you have a customer record connected to your admin user), click your initials in the top right corner, and select Page Editor.
Multi-location spaces: The Members Portal for each location within a network is a separate instance, allowing you to design each one separately. If you make changes in the Network location, these will not be copied to the other locations.
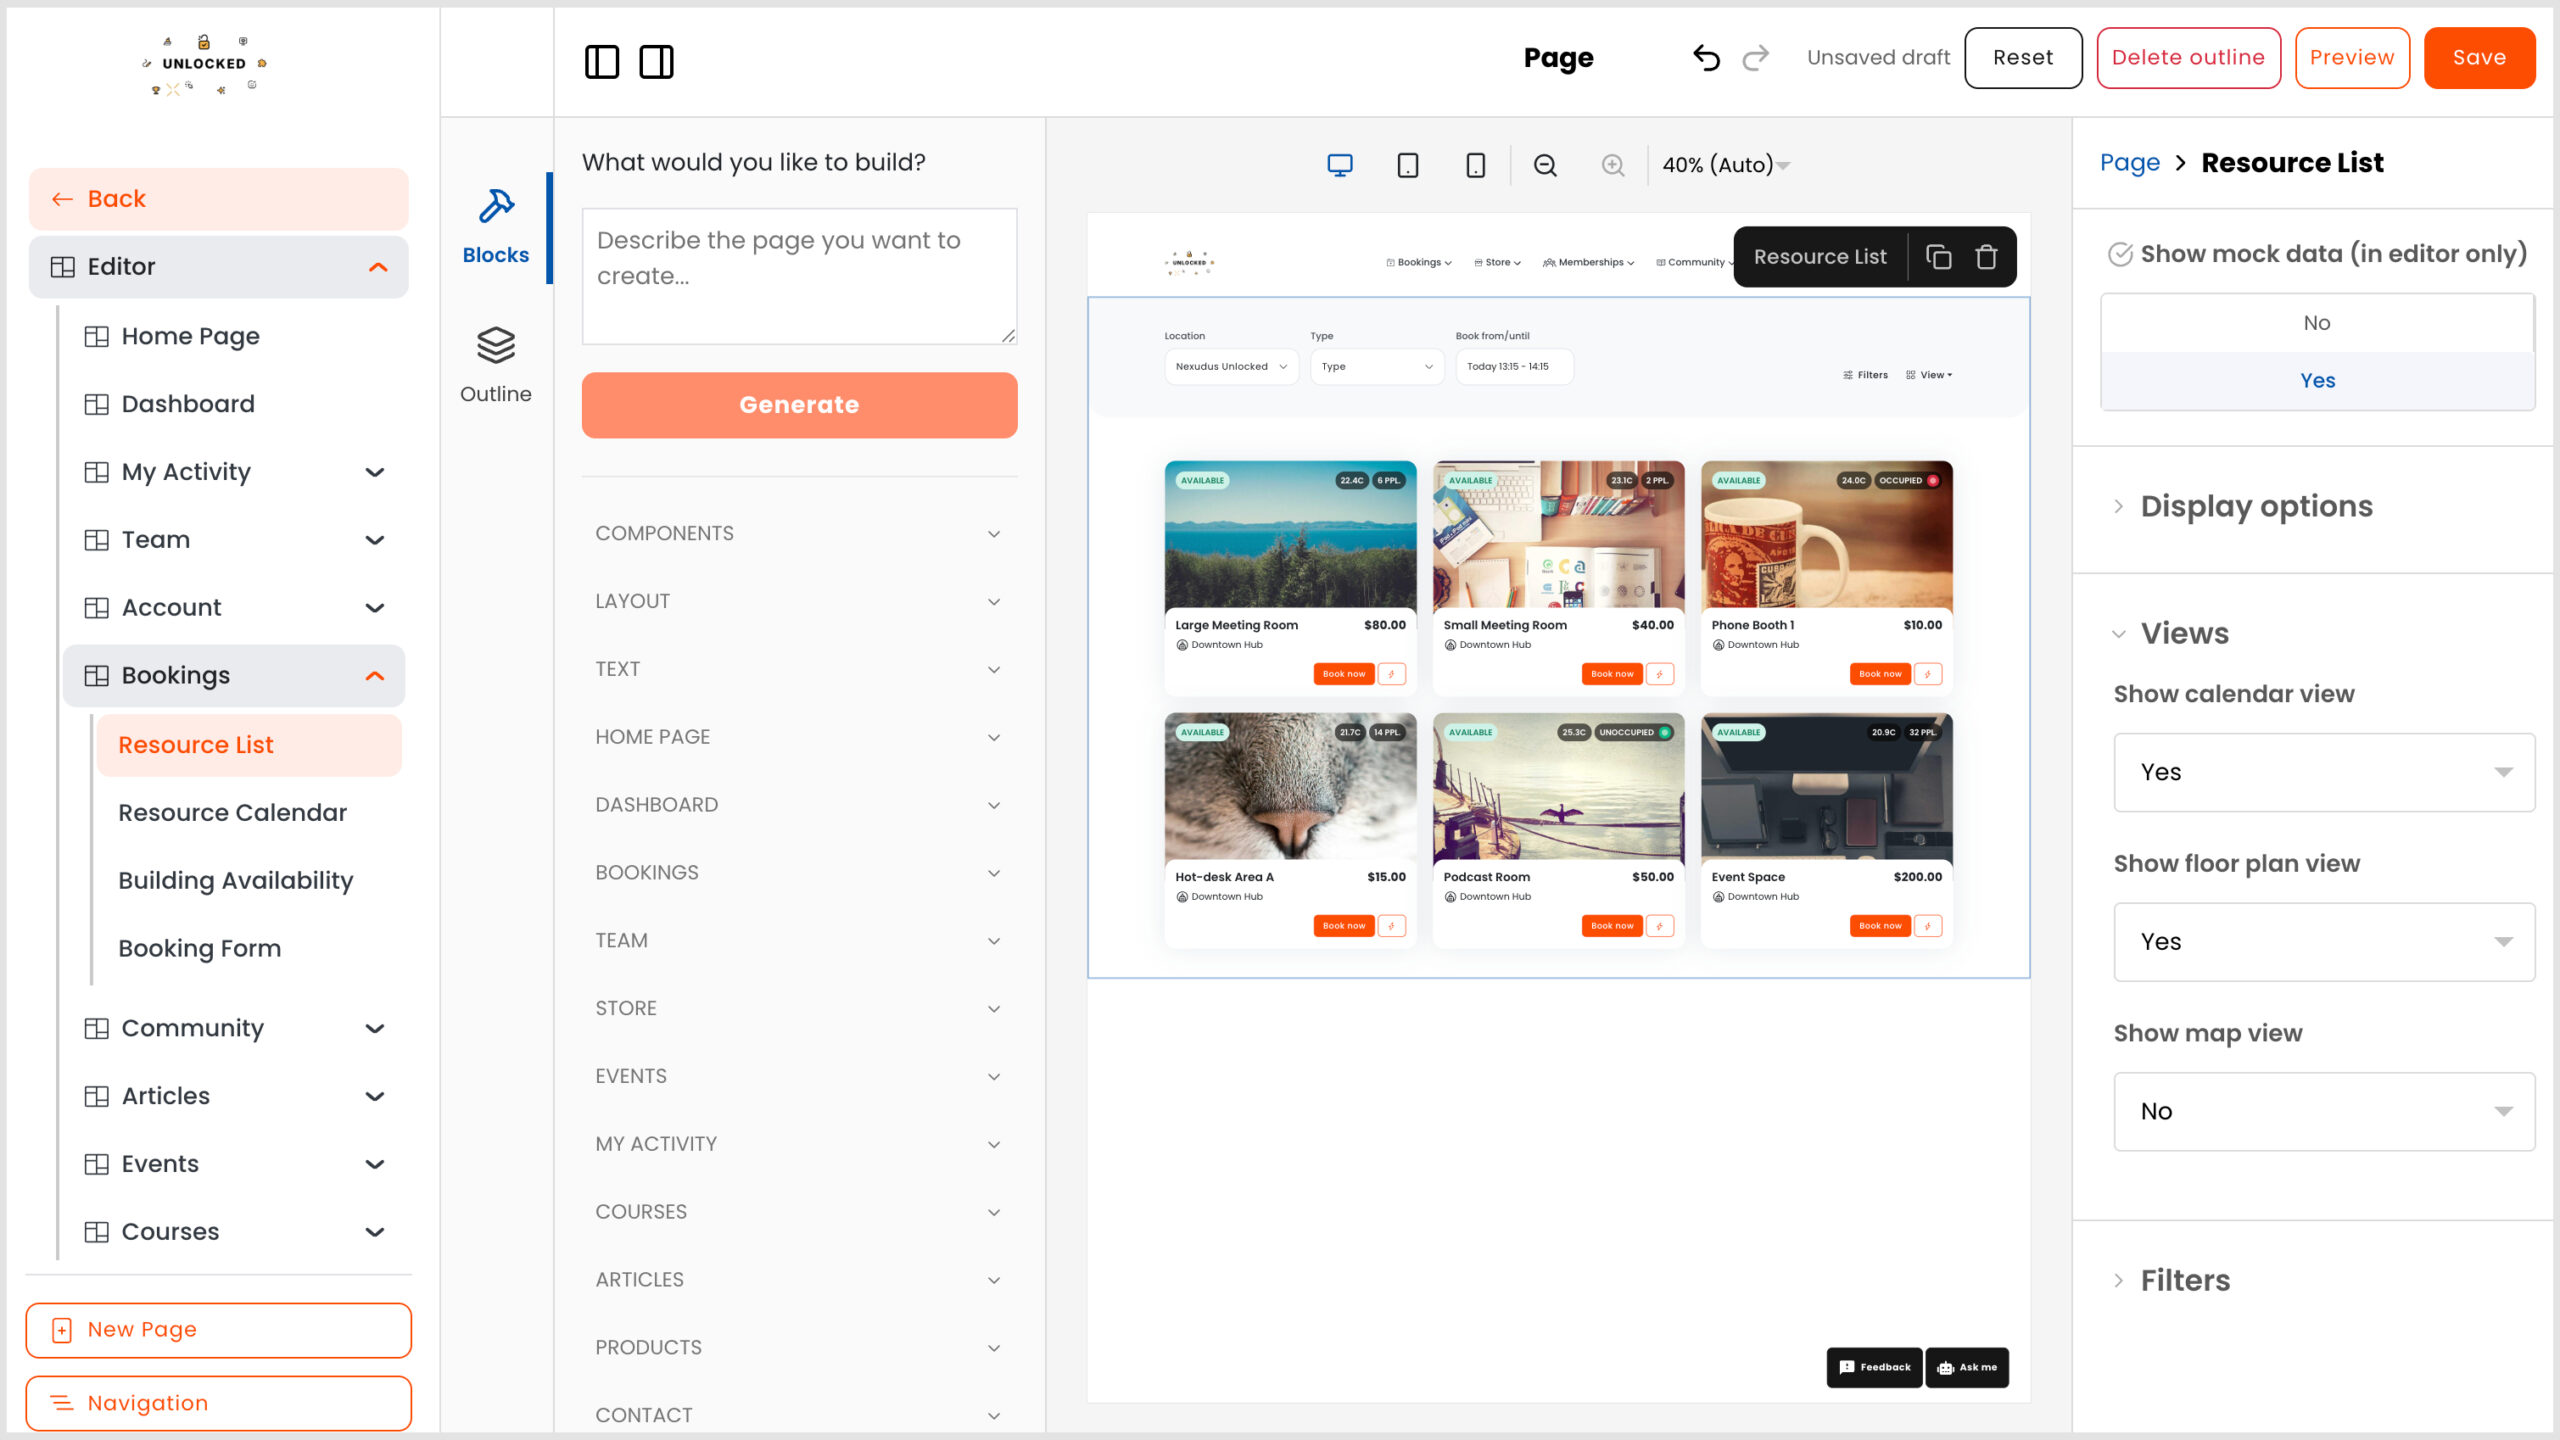
Navigating the Workspace
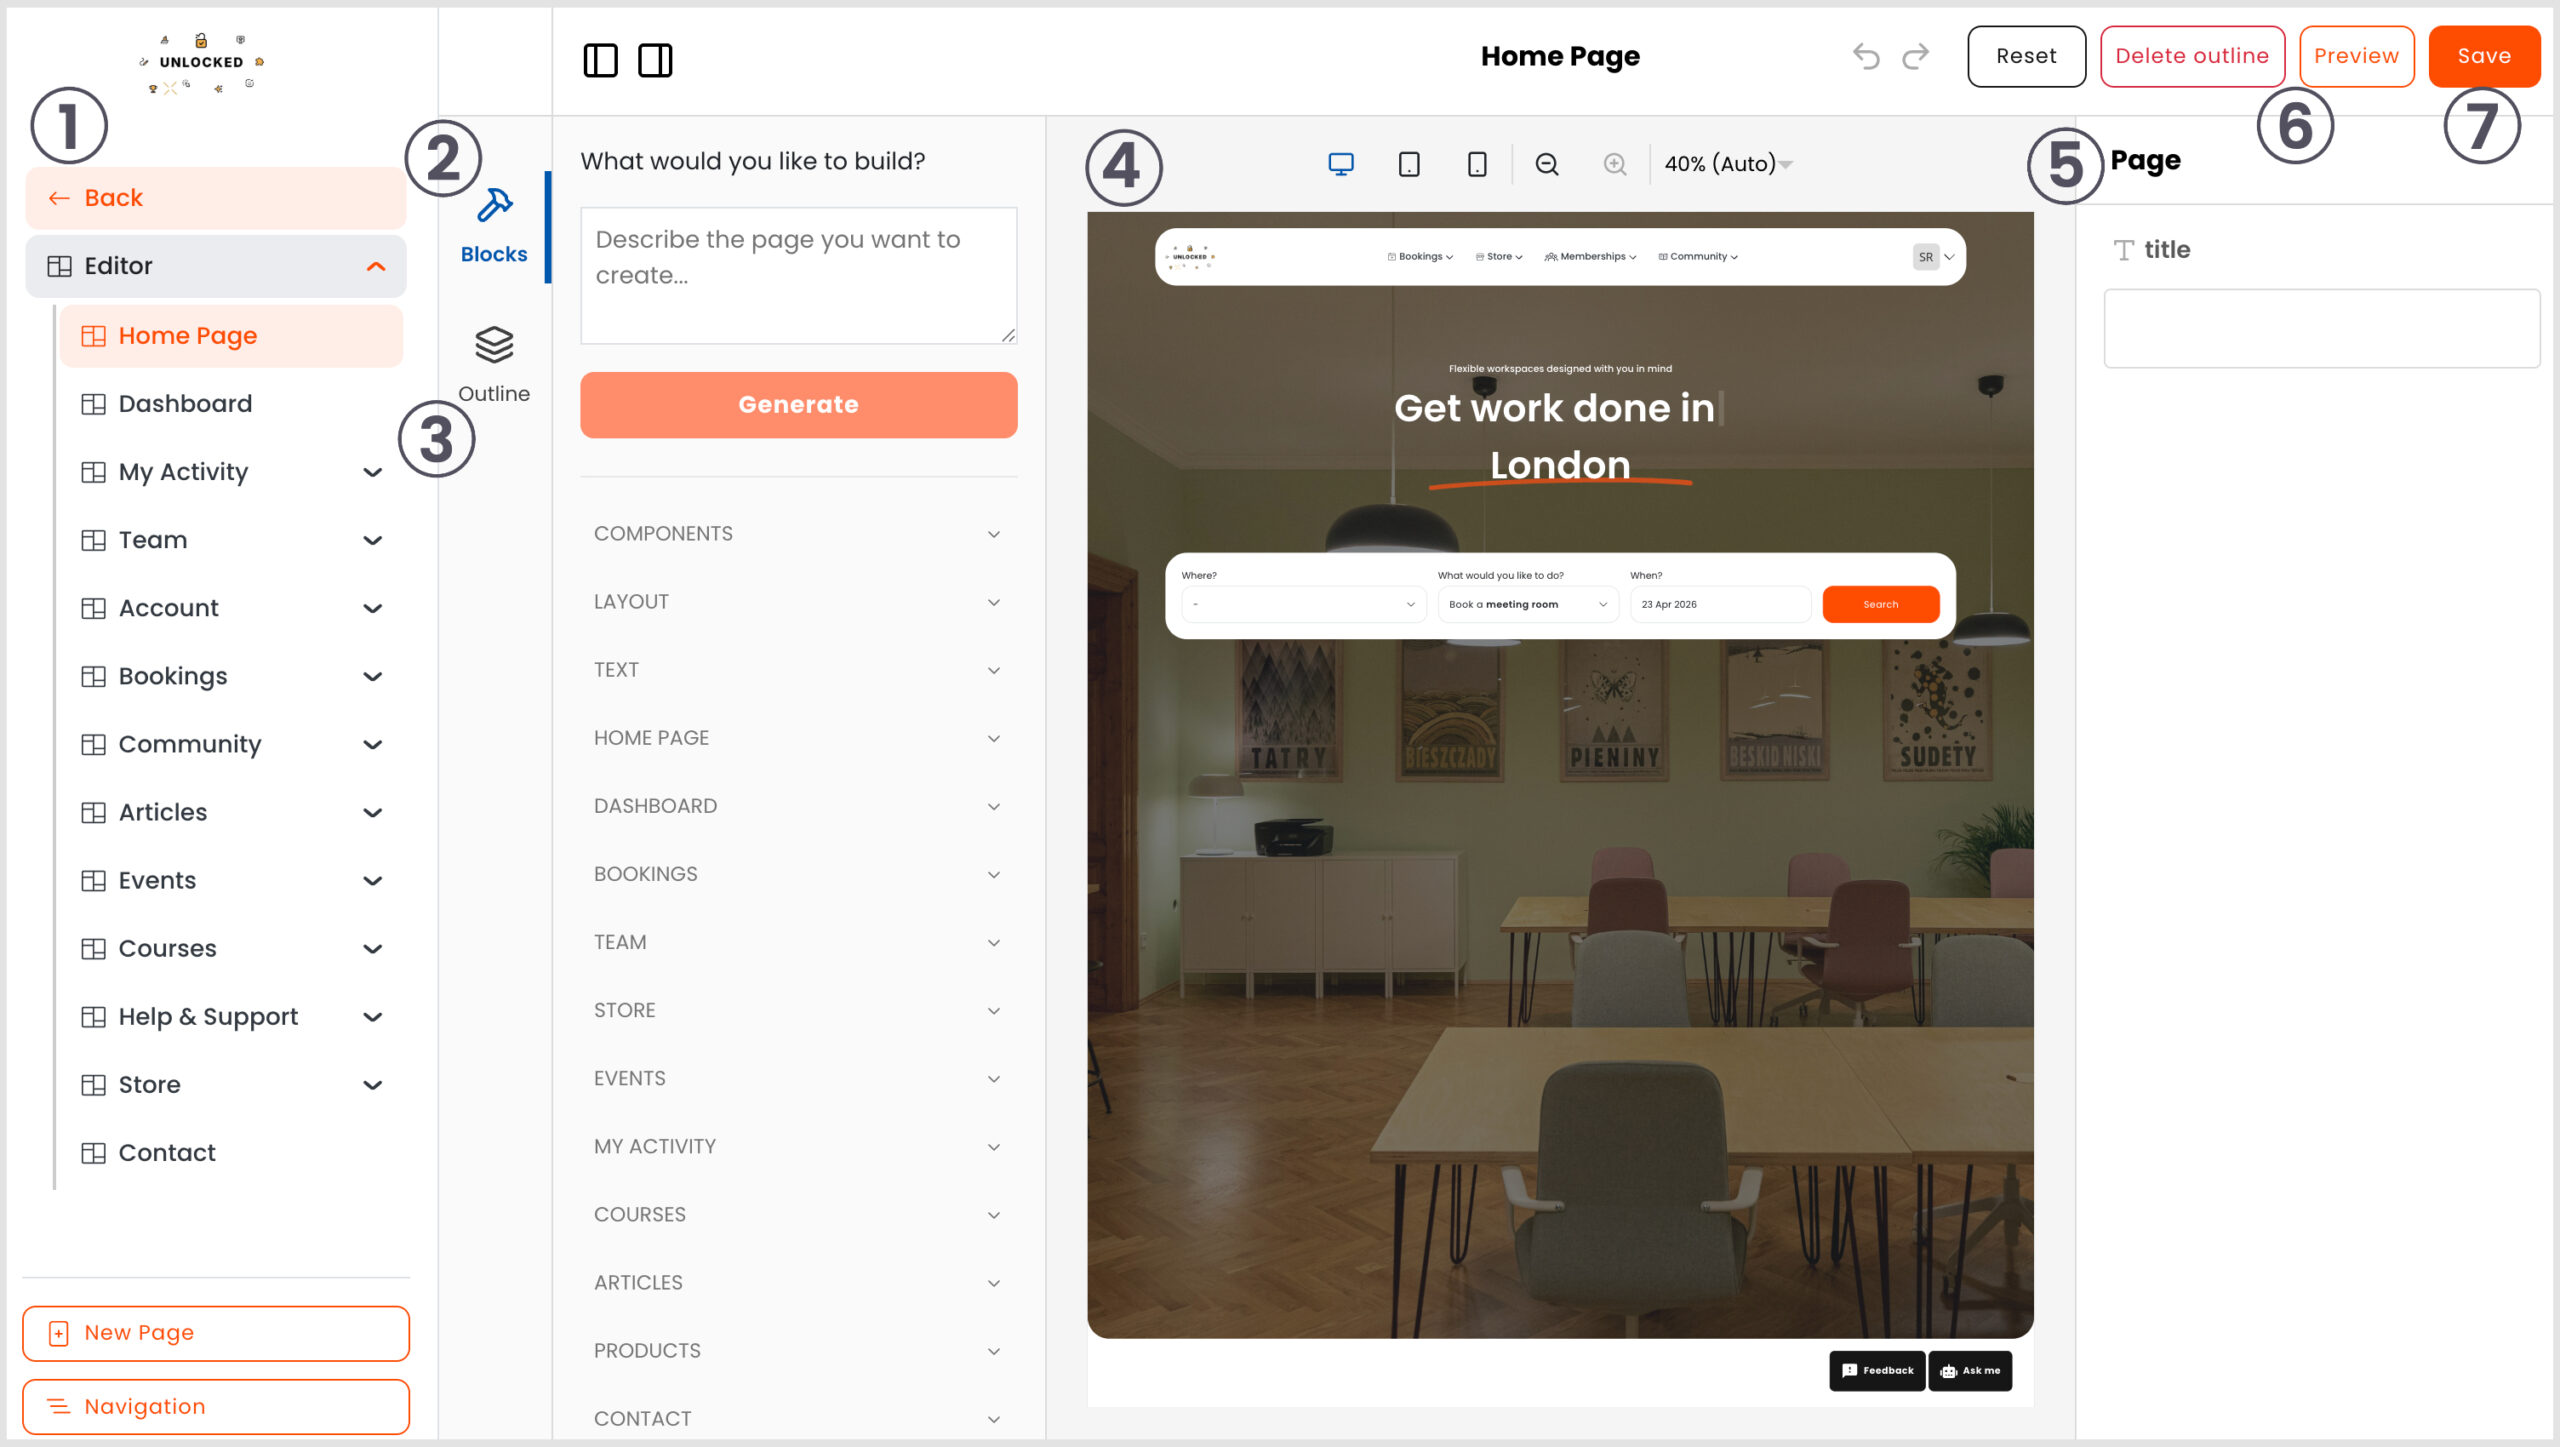
The editor workspace is designed to give you full control over the layout:
- Sections (Left Panel): Contains a list of all portal pages grouped by section. Select a section from the list for it to appear in the canvas.
- Blocks: This is where you find pre-made components and basic elements like text, cards, buttons, and image holders.
- Outline: Displays a layers-based view of every component and layout element currently on the active page.
- Canvas (Center): This is where the page is displayed and edited. You can switch between mobile, tablet, and desktop views to ensure the design is optimal for all views.
- Action Panel (Right Sidebar): This is where you edit individual component properties, such as background colours, spacing and visibility toggles.
- Reset & Delete: Reset returns the page to the last published version. Delete outline resets the page to the default template.
- Save: Clicking this will publish any changes you’ve made. Make sure you click Save on each page to avoid losing any changes.
Building and Customising Pages
When editing or creating new pages, it is best to follow these three structural guidelines:
- Add a Container: These blocks are built to respect the default page margins used across the site.
- Add Structure: These elements (like a “Stack”) are dropped into containers to define the page layout.
- Add Components: Drop in pre-made section components or basic elements (text, images, videos). Blue visual slots appear within the editor to guide you on where components can be placed.
By using the default page outlines, your portal automatically remains up-to-date. Any future improvements or new blocks added to the default templates will appear automatically. Even if you don’t use the default page outline, any new components we release will still be added to your blocks library, giving you the flexibility to pick and choose which features to incorporate.
To create a new page, click New Page in the left-hand menu. You can choose to select from a template or create a blank page. If you choose to create a blank page, use the guidelines above.
With new pages, you can determine the visibility: unpublished, hidden, published or only members.
Mock Data: In the action panel, toggle “Mock Data” to see how pages look even if your account doesn’t have much information yet. This is only visible in the editor; when previewing, you will see your own data.
Pro Tips for Customisation
Home Page Background Image: To update the background image on the home page, first upload the image to the image files via the Admin Panel.
Copy the URL from the Admin Panel and paste it in the Members Portal Editor.
Customer Type Layout Component: This component allows you to configure a page for different users. For example, you can customise a dashboard specifically for “Contacts” and another for “Members.”

Logo Redirection: By default, clicking the logo in the top-left redirects users to the marketing landing page. To change this, enter a different URL into the Redirect URL field. If you wish to redirect your customers to the dashboard, copy the end of the Members Portal URL, for example, /yourcoworkingspacename/user/dashboard/personal
Note: If you redirect customers to the dashboard, the marketing landing page isn’t accessible and customers will be required to log in to use the Members Portal.
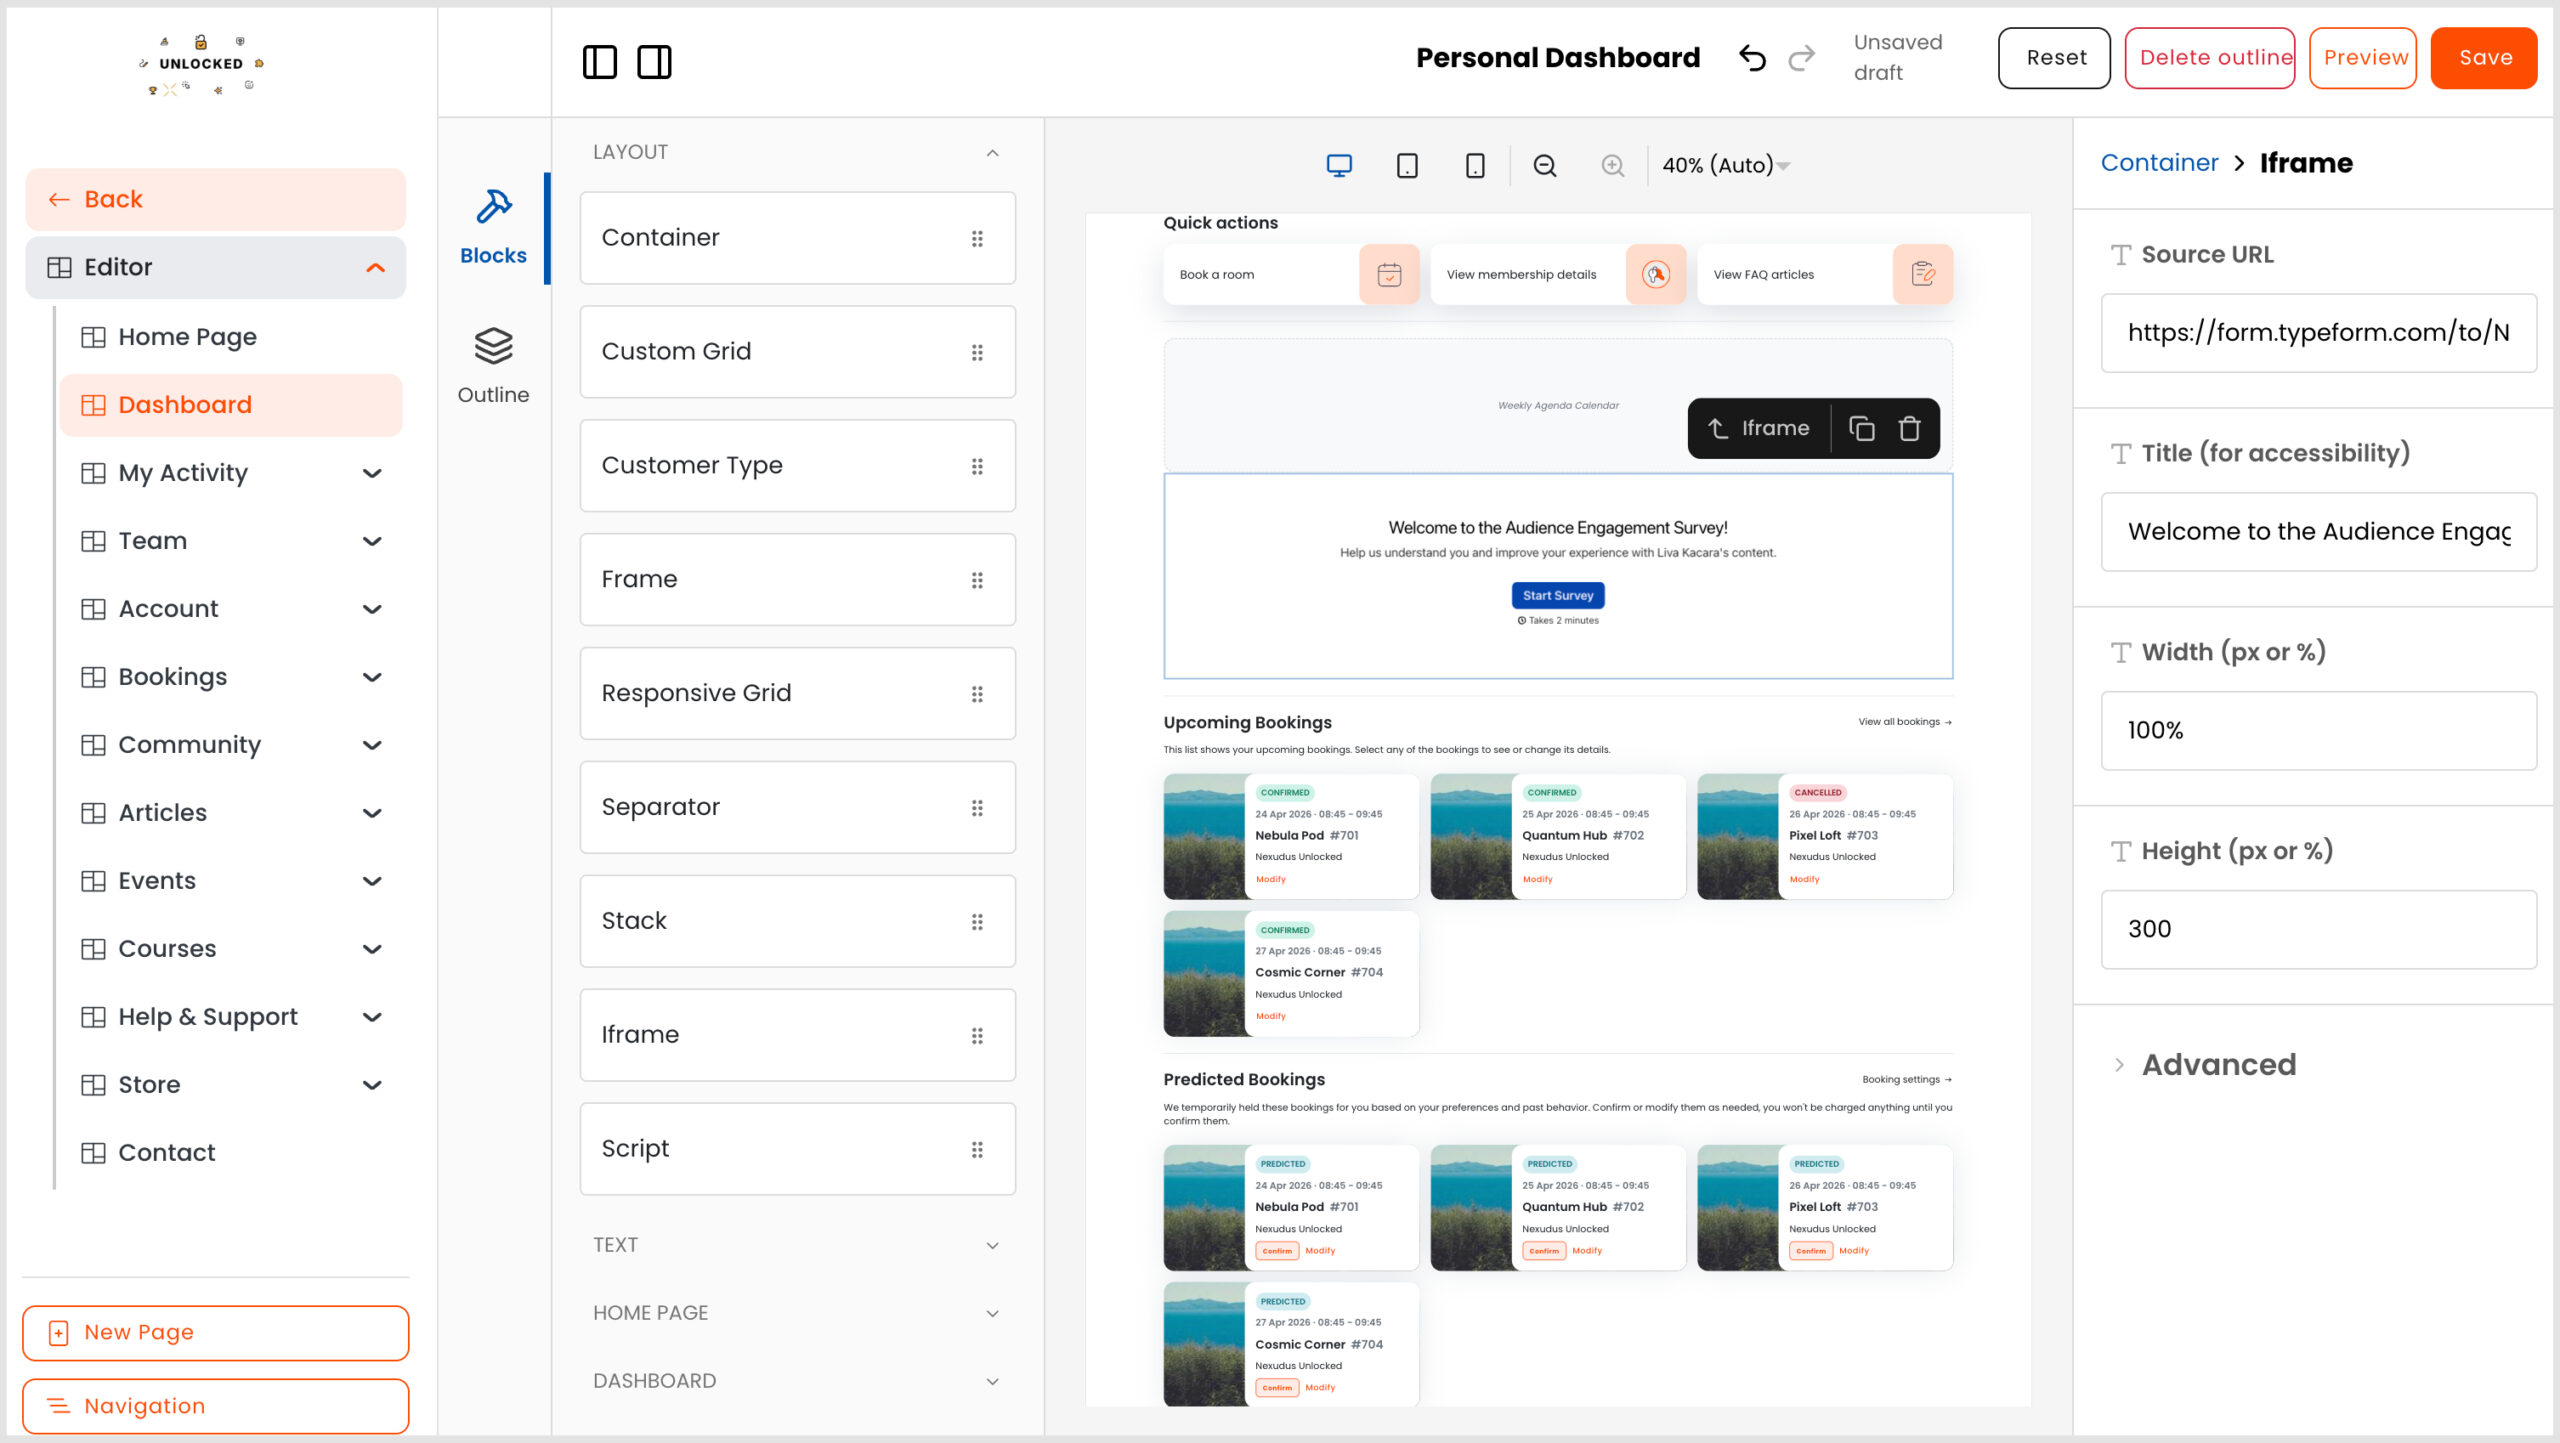
Embedding component: There are a few embedding components you can drop into a page. The iFrames component allows you to embed external URLs (e.g. a Typeform or YouTube video) into the web page.
Script component: The Scripts component allows you to drop in a raw JavaScript file URL for more customisations (e.g. a Rate your experience survey).
Hiding the header and footer: You can hide the header and footers of a custom page by entering the following snippet to the end of the url – ?hide-header=true&hide-footer=true
Article formatting: Basic formatting functionality is still controlled in the Admin Panel. However, text alignment is controlled in the Editor.
Advanced Features & Settings
Embeddable Website Widgets
Embed the Members Portal directly into your marketing website. This creates a seamless experience where customers never leave your brand environment.
- Reduced Friction: No separate login processes or redirects.
- Responsive by Default: The widget adapts to any container width and dynamically adjusts its height.
- Multi-widget Support: Multiple portal sections can run independently on the same page.
For more information on widget embedding, click here.
Booking & Checkout Flexibility
- Booking Views: Choose which views (calendar, floor plan, or map) are visible to users.
- Hide Checkout Elements: You can now easily hide specific elements like notes, guest sections, or desk selection in the Booking Forms page.
- Basket feature: In the first iteration of the new Members Portal, the basket feature has been removed, however, as a future enhancement, you’ll be able to turn on or off the basket.
Refined Admin Controls in the Admin Panel
Settings: The settings within the Admin Panel, take precedence over the settings in the Members Portal. You still control who can access the different Members Portal sections from the Website > Access.
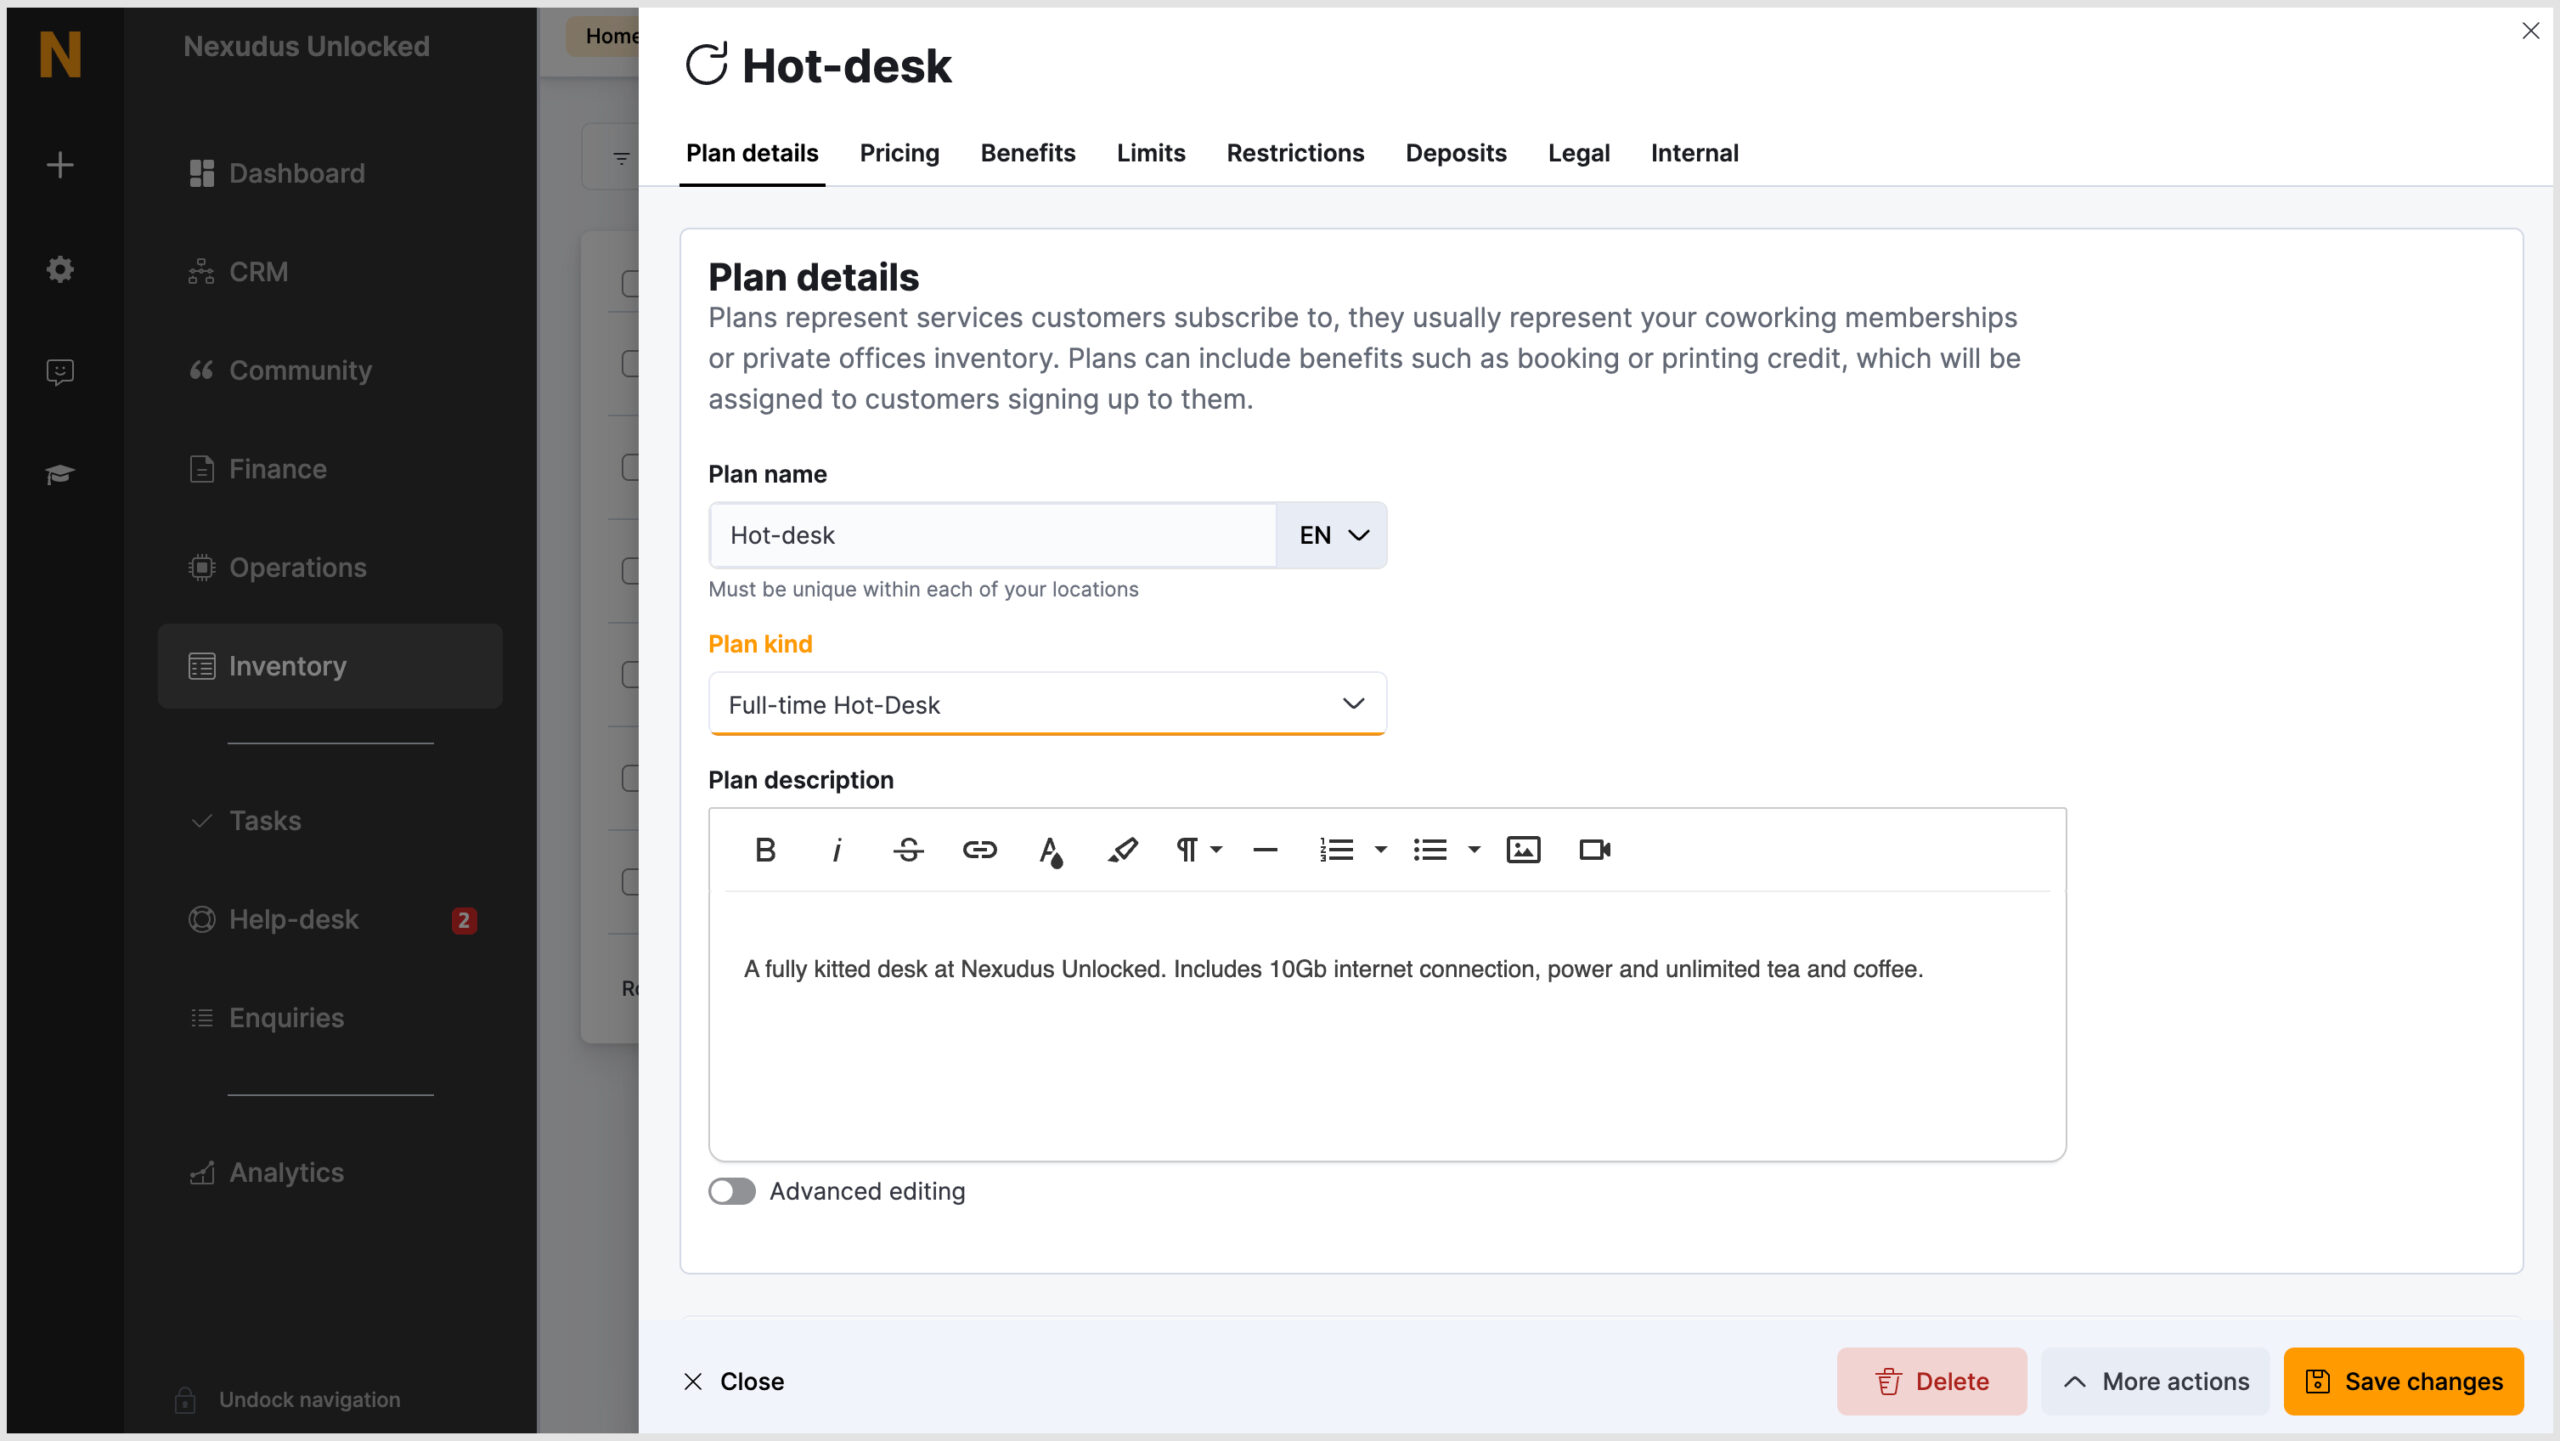
Product/Plan/Resource Kind: In the Admin Panel, there is a new field called ‘Product Kind’, ‘Plan Kind’ or ‘Resource Kind’. These fields are a key navigator for the new Members Portal. By default, the system will select the most relevant option from the drop-down list.
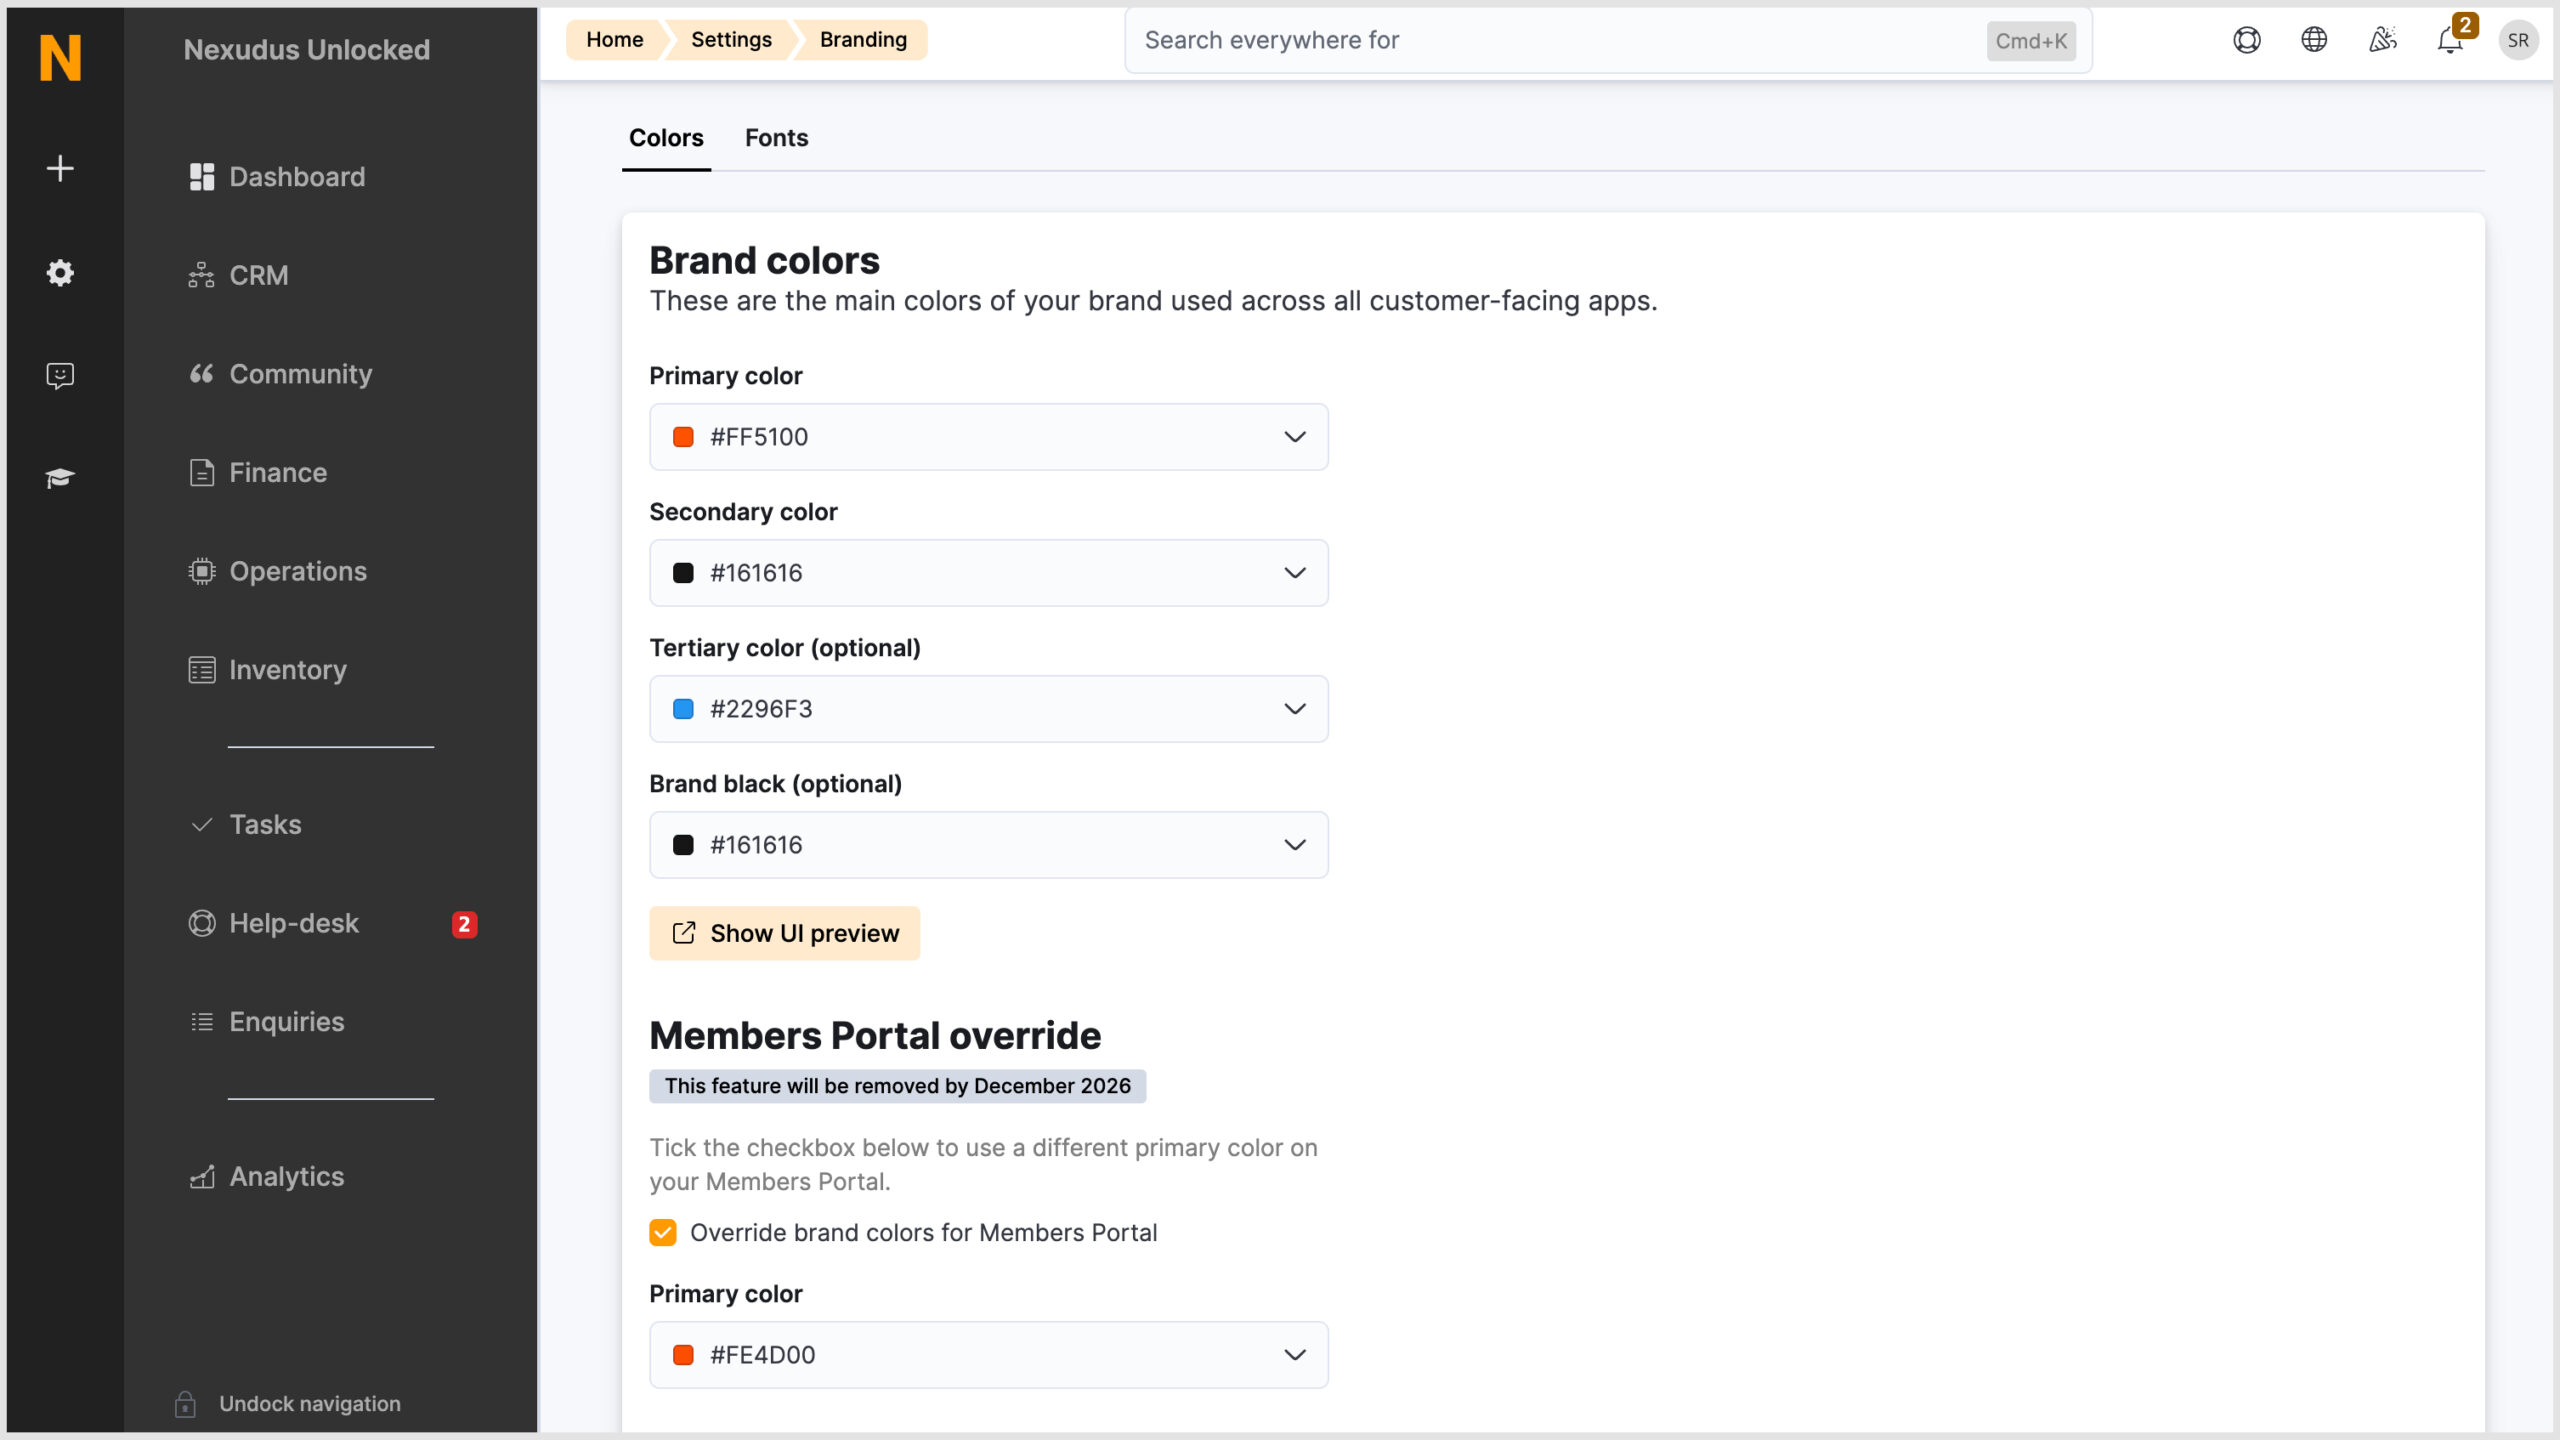
Unified Branding: Colours are managed in Admin Panel Settings > Branding. You can specify primary, secondary, and tertiary colours for the portal and companion apps, or use the Override section for specific portal branding.
Language Tokens: To update specific text on the Members Portal, language tokens are still required via the Admin Panel. See the Knowledge Base for information on editing language tokens.
Guest checkout settings: If you’d like to use the guest checkout feature, you’ll need to ensure the following has been set up from the Admin Panel:
- Enable the ‘Require up-front payment for online bookings made by contacts’ setting. (Settings > Sign-up and checkout > Checkout tab)
- Disable the ‘Bookings made by contacts must be confirmed first by an administrator’ setting. (Settings > Booking and calendar settings > General tab)
- In the default sign-up form, only capture the information that your payment gateway requires. For example, individual or company, name and email address. Including additional fields in the default form will disable the guest checkout.You can find more information here.
Navigation Editor
In the Navigation section of the Editor, you can reorganise the portal’s top navigation menu and create new navigation groups.
Simply drag and drop the pages into different categories to reorganise the portal.
Create a new navigation group by clicking + Add group. Enter the name and then drag pages under the heading.
- Requirement Logic: Navigation groups only appear if their underlying requirements are met (e.g., the “Membership” group only appears if there are published plans).
- Keep the navigation groups to a minimum as all groups are added to the top navigation bar.
AI Assistant
The built-in AI assistant on the Members Portal is trained on your resource, booking, and published FAQ data. It can assist with booking rooms, updating or cancelling existing bookings, and answering policy questions.
Enquire only plans
You can set all plans or specific plans to “enquire only” and prevent them from being purchased directly on the Members Portal.
- In the Admin Panel Settings, navigate to Sign-up and checkout > Checkout tab.
- Enable Allow customers to enquire about certain plans on the website.
- Select the plans.
- If applicable, tick the Prevent selected plans from being purchased directly checkbox.
- Click Save settings.
When customers submit a plan enquiry on the Members Portal, the system will automatically create a proposal.
Want to know more about
how Nexudus could help your business?
We’re here to answer any questions you have.