NexKiosk v2
Version 2 of the NexKiosk app makes it easier for your customers to purchase products on a self-service basis. They can choose to charge the purchases to their account and pay later or pay instantly. Guests can now also make quick sales, allowing you to open your self-service honesty bars to your guests.
The admin experience has also been greatly improved to make the process much easier. You can process customer sales, check invoice status, maintain stock levels and much more.
NexKiosk still has two modes: Kiosk and POS
The Kiosk mode is designed for your customers. This mode allows your customers to purchase products, e.g. refreshments or passes, on a self-service basis. The purchases can be added to their next invoice or paid upfront by card.
An example of when Kiosk mode is used is in a cafeteria or an honesty bar. Customers can help themselves and add what they took to their next invoice or pay immediately by card.
The POS mode is designed for you, admins. You can use this app as an extension of the Admin Panel to sell products, process customer payments and access invoices. When the app is being used in POS mode, it works like most staffed checkouts.
You can add products to the cart and then choose to either charge the customer on their next invoice or have them pay by card.
NexKiosk settings in the Admin Panel
In Settings > Companion Apps > NexKiosk, there are a few new settings.
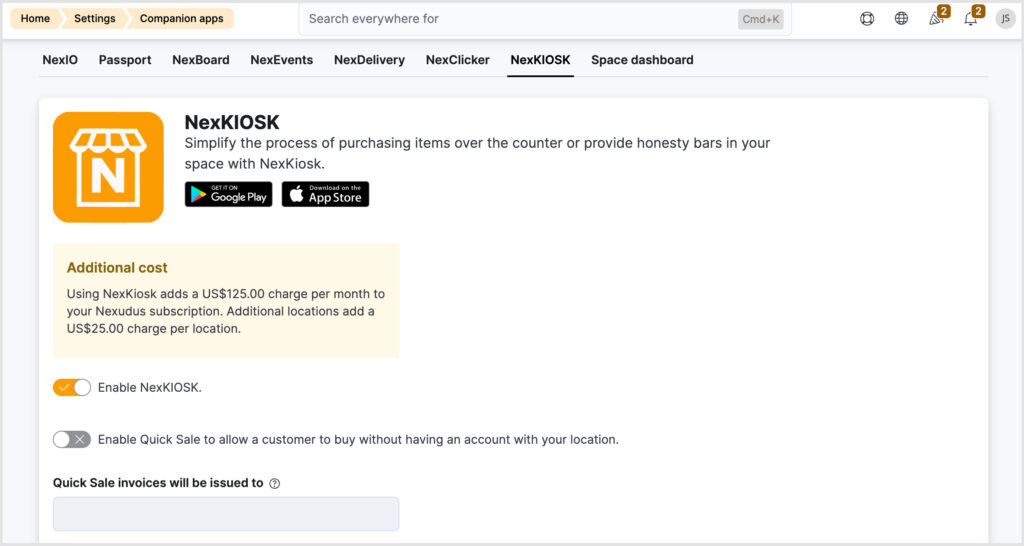
Enable Quick Sale to allow a customer to buy without having an account with your location. When this setting is enabled, customers without an account can purchase items on the NexKiosk app.
All quick sale transactions will create an invoice, however, as these customers do not have an account in your location, the invoice will be issued to a select customer. The system will create a default quick sale customer record the first time the Quick Sale option is selected on NexKiosk.
By default, the quick sales customer is called: NexKiosk {name of the location} Customer with the email of the following format: no-reply+nexkiosk_{currentBusiness.Id}@nexudus.com
Admins can change this to a specific customer by selecting them from the drop-down field, but they must be a contact, they cannot be part of a team and they mustn’t have any discounts or credits.
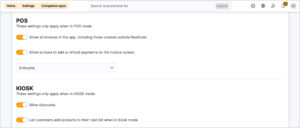
Show all invoices in the app, including those created outside NexKiosk in the POS section. When this setting is disabled, you’ll only see invoices that have been created in the NexKiosk app. If you wish to see other invoices, simply enable this setting.
Show buttons to add or refund payments on the invoice screen in the POS section. When this setting is enabled, you can add or refund payments from the invoice screen when NexKiosk is used in POS mode. Admins can select whether this is for everyone, only members or only contacts.
Allow discounts in the KIOSK section.
When this setting is enabled, customers will see a discount option during the checkout process.
Setting up the NexKiosk App
Setting up the NexKiosk app is straightforward. As an admin, you simply need to log in to the device, select your location and then select the mode (Kiosk or POS). This setup hasn’t changed too much from the previous version app, however, once the mode is selected, you’ll be able to select how payments will be processed.
Please see the Knowledge Base for more information on setting up the payment processors.
If you don’t want to connect to a card payment processor in Kiosk mode, you can select Nexudus Only. This will disable the Guest checkout option (aka a quick sale), and only customers with accounts will be able to make purchases.
In POS mode, you can also choose not to connect a card payment processor by selecting Nexudus Only. This will disable the quick sale option. However, if they have an externally managed payment terminal, you can select Nexudus Only and then select one of the Credit Card Manual Payment options in the drop-down. This will allow you to use the quick sale option and mark the payment as collected at the end of the transaction.
Kiosk mode
Let’s take a quick look at the Kiosk mode from a member’s perspective.
The basket details on the right of the screen may differ depending on how the purchases are being paid for. Below are some examples of what the basket details will look like.
Example of the purchases being paid for by the individual:
Example of the credits being used to pay for the purchases:
Example of the purchases being charged to the team paying customer. If some items are to be paid for by the individual (depending on each product’s settings), this will also be displayed.
Depending on the Admin Panel settings, members may also be able to apply a discount to their basket. They can simply click More options on the right of the screen and enter the discount code.
Quick Sale
Let’s take a look at how guests can make purchases in Kiosk mode.
This is considered a quick sale transaction and will only appear if a card payment processor is connected. See the Knowledge Base for more information on connecting a payment processor
In the Quick sale option, discounts cannot be applied to the sale.
POS mode
In POS mode, admins can record purchases, see invoices, record payments, issue refunds and even maintain stock records.
Products will need to be ‘transferred’ to the NexKiosk inventory in order for them to show up in POS mode on the app. This is done by enabling the Transfer this product toggle in the product record on the Admin Panel.
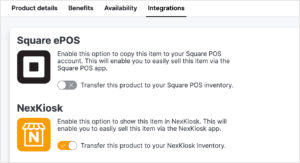
Please note that this setting is only relevant for POS mode. For products to appear in the KIOSK mode, the Display this product on the website and the App setting must be enabled.
Customer Sale
Let’s take a look at how an admin can process a purchase.
You can also add new customers from the POS mode. On the customer selection page, click Add a customer. Enter the customer name and email address.
If the customer is part of a team with merged billing, you can decide who the purchase is to be charged to: the team paying customer or the individual. Unlike in the Kiosk mode, this choice is per basket, not per the individual products in the basket.
Quick Sale
Just like with the Kiosk mode, you can complete a quick sale in POS mode. However, it is only an option if a card payment processor is connected. See the Knowledge Base for more information on connecting a payment processor.
In the Quick sale option, discounts cannot be applied to the sale.
Customer list
In POS mode, as an admin, you can see a customer list. You can select a customer to see a list of all the purchases the customer made on NexKiosk. If a product has not been invoiced, you will have the option to remove the purchase from the customer’s account.
Invoices
In POS mode, you can see all invoices created as a result of purchases on the NexKiosk app by clicking Invoices in the left-hand menu. You may see other invoices here if you’ve enabled the Show all invoices in the app setting in the Admin Panel.
The quick sale invoices are easy to find as they show as having been billed to NexKiosk {name of the location} Customer.
If the invoice is unpaid, you will see a Pay button. However, if the invoice is paid, you will see a Refund button.
Product list
In POS mode, you can also maintain and adjust your stock levels of products as necessary.
Click Products in the left-hand menu and then select the relevant product.
Want to know more about
how Nexudus could help your business?
We’re here to answer any questions you have.